Sunday, June 1, 2014

Comparing The Values Of Planes

Although the values of planes on a form are caused by a logical relation of how much each plane is facing a light source(s), the differences in the values of those planes appear so subtly that it can be very beneficial to utilize thought processes that make comparing the values of planes easier.  Two of those thought processes are described in this post.

 For each form that I have to model I investigate the location of the point on each form that is most facing the light, also known as the high form light.  To identify the location and value of the high form light it is helpful to evaluate the difference in the position of each of the planes on a form as they relate to a center, which is the light source.
I used concentric circles to illustrate the shape of a magnetic field in this diagram because they are simpler to evaluate than the actual shape of a magnetic field.  Although the shape of magnetic fields are not technically shaped in concentric circles, the shape of a magnetic field has the same geometry as concentric circles. 
 A useful analogy in identifying the high form light is to imagine dragging a magnet on top of each form.  If I imagined the light source as projecting a magnetic field outwards from the center of the light, that is strongest at the center of the light, the magnet on a form would be most attracted to the area of the magnetic field that is closest to the center of the light source.  The magnet on the plane that is most facing the light shows where the high form light is located on a form.


The diagram above shows how magnet A is striking the magnetic field closer to the center than magnet C, because magnet A is facing the light source more than magnet C.  One can imagine the directional path that one would drag a magnet across a form in any direction, whether horizontal, vertical or tilted sideways in order to investigate the position of the high form light on a form.

I used the idea of the magnet and the magnetic field to determine which plane was most facing the light source and then could compare how much the other planes on a form darkened in value away from the high form light plane.  This thought process was also very helpful in managing the hierarchy of value for each of the forms that I tried to represent in my drawing.

Simplifying Forms

The forms and transitions on a cast are made up of planes. A plane is a flat surface of any size that faces the light in a specific direction.

An example of three large planes that are lighter or darker based on how much they are facing the light.
 The planes on a cast can be examined down to the point where the planes can be viewed as tiny microscopic planes, known as micro-planes, each facing the light in specific direction.  But this type of evaluation can become so overwhelmingly complex that it can be useful to identify a larger value hierarchy by simplifying the cast into large planes.

A painted study of the planes on a cast.
By simplifying the planes that generally face in the same direction into larger planes one can more easily get a sense of the effect of light over the entire cast.  Because it can be difficult to pin-point which of the many planes on a cast are generally facing in the same direction it is useful to examine the cast by squinting and looking at it slightly out of focus.  By simply evaluating the large value relationships one can more easily determine which planes are grouping together in value because they are facing in a similar direction.  I referred to the study shown above throughout the process of modeling my cast drawing when I was concerned with the large relationships on my drawing.

Dissecting A Cast


When presented with the amazing complexities of a cast one can be overwhelmed at first glance.  But by becoming familiar with the components that make up the complex structure that one sees on a cast one can more easily approach the task of representing such a fascinating cast.  As far as I know, the structure of a cast is made up of two simple components, forms and the transitions between forms.
   
Identifying Forms

     When looking at the hand cast shown above one can see many bulges.  These bulges are called forms.  A form is most often a bulge, known as a convexity,  but sometimes a form is a dent, known as a concavity, seen on the surface of a three dimensional structure.

     Often many of the bulges on a cast appear so subtle that it can be difficult to distinguish the boundaries of individual forms.  One can consider a form's boundary to continue through the transition into another form, but in order to simplify my thought process I define a form's boundary as the ending points of a form's convexity.

This illustration used the background image taken by Snowdonia

A form's boundary is just like the edge of a valley between mountains.  The edge of the valley that defines a form's boundary may be more distinct between some forms more than others, but between the bulges of any forms there is always a boundary.  
     
     Depending on how opposed forms are and how much the forms are facing the light these boundaries can be very difficult to distinguish on a cast.  To see these boundaries on a cast one just has to search for where the convexity of each form tapers off to transition into a new form to determine the boundaries of a form.  To better see these boundaries it is useful to look at a form from many angles.  Another thought process that I have found helpful in determining a form's boundary is to imagine spreading my fingers down in all directions from the point on a form that is most facing the light until they meet the bottom of a form's convexity.

Outlined boundaries of the large forms on the hand cast.
     I used the logic of investigating the boundaries of a form to map out the boundaries of each of the larger forms on the hand cast.  I avoided trying to identify the smaller forms, known as sub-forms, that sit on top of the larger forms in order to more easily get a sense of the larger forms that made up the majority of what I saw on the cast.

Evaluating Transitions

 The areas of transition between the forms on a cast connect the forms together.  
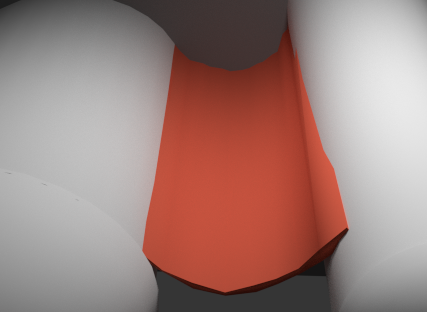
A section of a transition area in red that connects two forms together.

Specific points along a transition that are important to take note of are the ending point of convexity on a form, the middle of a transition between two forms and the beginning of the convexity of a new form.  A useful analogy for evaluating the transition areas between forms is to imagine how it feels to transition from one hill on a roller coaster to another.
This illustration used the background image taken by Karyn Christner
The diagram above shows how it feels to be at different points in the transition from one hill to another on a roller coaster that is moving from the hill on the right to the hill on the left.  The point where one is most scared after plummeting down the steep hill of a roller coaster would be comparable to the ending of convexity on a form.  The point where one is most calm would be comparable to the end of the transition from the form that one just came down and the beginning of the transition upwards into a new hill.  The point where one is beginning to feel anxious again is comparable to the bottom of the convexity on a new form before it begins to turn upwards towards the highest point on the hill.  This roller coaster analogy was helpful to me while I evaluated the transitions between forms on the hand cast. 
By focusing on the aspects of the forms and transitions on the hand cast I was better able to represent the cast in my drawing that will be described in an upcoming blog post.

Sculpture As A Drawing Supplement

This is one of the final posts describing what I learned during my time studying at The Cambridge Street Studios.  Things just didn't work out for me there and I will no longer be studying at The Cambridge Street Studios.  I will be continuing the classical curriculum elsewhere and I will continue making blog posts about what I am learning.

The process of modeling form while drawing is so similar to sculpting form in clay that it is beneficial to sculpt in order to enhance one's understanding of modeling form.  I only have experience working on one sculpture copy (which cracked into pieces before I finished it because I was not watering it consistently) but I will explain the process that I used for that sculpture copy in this post.  This post also describes how sculpting enhanced my understanding of modeling form while drawing.  Footnotes are included in this post to indicate which sentences in this post are summarizations of ideas that the instructors at The Cambridge Street Studios explained to me.

Sculpting Tools
I used a variety of tools while working on my sculpture.  Although I don't know the appropriate names for all of those tools, a description of the use that I made of each tool is described below.

- Used early in the modeling process to sculpt the general curvature of forms.  The pointy end on the bottom was used for drawing the shapes of planes and forms into the clay.¹
 Rake- This tool comes in a variety of sizes to generally smooth out large or small planes of forms.¹ 
Knife- This tool comes in a variety of sizes to cut large or small chunks of clay from one's sculpture.¹  I used this tool mostly during the block-in stage of my sculpture copy.
 - Used to flatten out planes of forms.  The pointy end on the bottom was used to draw the shapes of planes into the clay.¹
 - Used to more specifically sculpt the curvature of a form.  The top pointy end was used to draw the shapes of planes into the clay.
This tool was also used for measuring the depths, heights and widths of parts on the cast.¹


- Used to more specifically sculpt the curvature of forms.¹
Wire- Used to measure depths, heights and widths on the cast.¹

Massing in Forms


I began sculpting by quickly placing the large masses of the cast.¹  This stage of the sculpting process is very similar to the block-in process used while drawing.  The masses of clay were quickly placed much in the same way that shapes are quickly placed at the beginning of the block-in process.
   
The cast and my copy were placed at the same height and placed on rotating tables so that I could angle the cast and my copy to view both in the same perspective while I turned my head back and forth from my the cast to my copy.¹  This was done to make it easier for me to copy the shapes of the planes that I saw on the cast.
   
I continued to evaluate the shapes that I saw on the cast in terms of animal shapes while sculpting too.¹   I would look at the cast and my copy from as many angles as possible to compare how opposed the planes were in relation to each other.¹  While making these evaluations I found it most helpful to view the forms in profile to get a clear view of how opposed the planes on a form were to each other.¹  Evaluating the opposition of planes in profile has been a great help in understanding the structure of forms while I am drawing as well.

Planarization Of Forms


I then used the rake tool to flatten out the large planes on the cast.¹  This stage of the sculpture process is very similar to the stage of drawing when I draw a few planes in strip of form before more subtly modeling a strip of form.  During this stage it was very important for me to make the large planes very flat and clearly delineated in order to easily evaluate the relations of the large planes to each other.  This made me further appreciate the importance of making the planes in a strip of form very flat and specifically shaped in order to more easily evaluate the relation of planes to each other in my drawings.

This stage of the sculpture process made it very clear to me that specificity in the relation of planes to each other makes the final stage of subtly refining the forms much easier.  With sculpture it is very difficult to adjust masses of clay during the final stage of refining forms so I had to focus on the importance of the large planes as the foundation for the subtly modeled form even more.  I began seeing how specificity in the relation of the planes to each other while I am drawing makes the next stage of subtly modeling form so much easier.

During this stage I had to do much problem solving of how to bend or add to the clay on my copy to more faithfully represent the forms on the cast.  I usually would resort to taking depth measurements of the most projecting point on a form and the deepest point on a form so that I could check the accuracy of those points on my copy to get a better sense of the points that I would have to bend down or up from to make my copy more faithful to the forms on the cast.  This process very much informs the drawing process.  In drawing instead of taking depth measurements I would determine the value of the point on a form most facing the light and the value of the point on a form least facing the light to decide how I have to bend the form in my drawing to better represent the forms that I see.

Refining Forms
My sculpture cracked shortly after I started the refining stage, so I only got to attempt to refine the forms of the eye and upper eyelid.

After the large planes on my copy were positioned and shaped, to the best of my current abilities, to represent the planes on the cast I began to more specifically sculpt my copy by subtly bending the planes away from the point that projected the most.  I modeled each form individually so that I could more easily focus on each form.  

Bending away from the most projecting point on a form is similar to bending a form down in value away from the high form light, plane that is most facing the light on a form, while drawing.  Drawing form is just as sculptural as sculpting form with clay. But with drawing the form can only be sculpted by bending the form down in value as it turns away from the high form light.

In order to more specifically sculpt the subtle curvature of form in this stage I would have to remove small planes that were protruding too much and add small pieces of clay to make areas of a form protrude as much as they should.¹  These small pieces of clay that had to be added to or removed from a form are essentially micro-planes and the process of adding and removing these micro-planes while sculpting is very similar to how one adds or removes dots of graphite in a drawing to more specifically describe the micro-planes that need to face more towards or away from the light on a form.

Through sculpting at this stage it became very apparent how much the shape of the planes are a result of the specific three-dimensional structure of a form seen in perspective.  I became more aware of how specific the character of the shapes in my drawings had to be in order to faithfully represent the structure of each plane.  Much in the same way, while drawing I became more aware of the fact that even the slightest improvement in the accuracy of a shape has much more of an impact in making a form more illusionistic than much improvement in the subtlety of a gradation.  The reason being that the gradation, that is the result of a form's shape and structure in relation to a light source, must specifically correspond to the exact shape of a plane in order to appear illusionistic.  By being able to compare my copy to the cast while sculpting I was able to internalize the fact that no matter how subtle of a curvature, in drawing a gradation, I made, if it did not adhere to the specific shape of a plane seen on the cast it would not appear faithfully illusionistic.

Sculpting was very beneficial to my understanding of modeling form while drawing, even though I didn't get very far on my sculpture copy.  I would often sculpt in the morning before I worked on my cast drawing in the afternoon and would become so immersed in sculptural thinking that I would initially approach my drawing by thinking of it as a clay sculpture. Of course it is not necessary for one to sculpt before approaching modeling form while drawing, but many artists find it useful to at least think of their decisions while drawing as having sculptural consequences.


Footnotes
¹Jeremy Deck, personal communication, 2013.

Saturday, May 10, 2014

Practicing Graphite Handling

I have been struggling with graphite handling but practicing a few simple exercises has been helpful.  When my instructors at The Cambridge Street Studios suggested that I find out which hardness of pencils easily produce specific values and advised that I practice drawing imaginary strips of gradation, I saw a direct connection to how those exercises would help me to develop control with the graphite medium.  My instructors also suggested ways to manipulate the graphite medium to produce more consistent results, which are described in this post.  Footnotes are included in this post to indicate which sentences in this post are summarizations of ideas that the instructors at The Cambridge Street Studios have explained to me.

Although the graphite medium can be difficult to control, the tools are not the enemy, they are the artist's friends but one just has to get to know them first.  By becoming familiar with how graphite can be manipulated and practicing simple exercises with the graphite medium one can better control the results of one's drawing.

Handling the graphite medium is based on pressure, meaning that the more pressure that is applied to a pencil the darker of a value that is produced.¹  So it is important to know how to manipulate the pressure on one's drawing materials to result in the values that one intends to produce.
 There are 4 factors involved in producing and maintaining an intended value with graphite.

-The sharpness of the point on one's pencil.

When initially laying in an area of value it is useful to use a slightly blunt point that has a bit of an edge to it.  Such a point is made by sharpening one's pencil and then rubbing it into the paper until the desired point is produced.  A point like this can easily be pushed against the paper on the flat side to produce an even value, while at the same time one can rotate the pencil to the sharp side to fill in any lighter areas that may have resulted from an uneven application of graphite from the flat side of the pencil.¹
A point that is much duller than the point pictured above will distribute graphite in unintended directions and will produce uneven values.  Also, initially laying in a value with a point that is much sharper than the point pictured above often causes the point of the pencil to grind into the paper, which results in distinct breaks in an area of value.

When tightening up an area of value a sharp point can easily fill in small areas that are too light.¹

-The angle that the pencil is held at.

Holding the pencil at a more perpendicular angle to the paper allows for more pressure to be applied, which often produces a darker value.

Holding the pencil at a more parallel angle to the paper allows for less pressure to be applied, which often produces a lighter value.

-The pace of applying graphite.
 

I have been applying graphite in an area by consistently pushing my pencil from left to right or vise versa, while often going back a bit to maintain a consistent value.¹  Applying graphite in this way is like gently pushing the graphite on the pencil onto the paper to produce an even value.¹  Then an area of value is tightened up with a sharp pencil that fills in lighter areas.¹
Applying graphite slowly can allow for one to easily maintain the amount of pressure on one's pencil, but applying graphite too slowly can cause distinct breaks in the application of graphite.  Applying graphite at a fast pace can allow for one to easily maintain the amount of pressure on one's pencil, but applying graphite too quickly can cause spots that have been skipped over on one's drawing.
According to Jeremy Deck, a balance must be found between the amount of pressure that is applied on a pencil and the pace at which it is applied in order to maintain a consistent value.¹

-The amount of pressure applied.
The amount of pressure needed to easily produce an intended value may vary with the degree of hardness of the pencil that one uses.  With little pressure applied each hardness of pencil will easily produce a consistent value that may be desired by an artist.¹  But one can alter the amount of pressure on one pencil in order to produce many values as well.
I have often found it useful to limit the amount of pressure to be used in drawing an area of value by using progressively harder pencils to tighten up an area of value after it has been laid in with a softer pencil.¹  According to Jeremy Deck, extremely hard pencils , such as a 6H, can be used with little pressure to more or less distribute the graphite that is already on the paper into the lighter spots on an area of value.¹

There are 2 factors involved with producing a value with a kneaded eraser.

- The shape of the eraser

A round point on an eraser that is covered in graphite is desired to gently lighten darker areas within a value and the size that one makes the point is dependent upon the size of the area that one intends to lighten.¹

-The angle that the eraser is held at.

By holding the eraser at a more perpendicular angle to the paper one can apply more force to lighten darker areas of value.

By holding the eraser at a more parallel angle to the paper one can easily apply little pressure to gently lighten darker areas of value.


Graphite Exercises


Everyone has their own graphite handling tactics and practicing value scales and drawing imaginary strips of gradation can help one to quickly discover how much one needs to alter the factors for controlling graphite and the kneaded eraser, described above, in order to produce intended values.  These exercises can be completed within any desired time frame as long as one focuses on finding ways to alter one's process to produce a desired result within a set time frame.
After each attempt at these exercises I have found it important to determine why one approach worked better or worse.  Without knowing the reasons for improvement it is difficult to improve consistently.  In my opinion, from my experience, progress from these exercises does not come from mere practice.  Rather, progress from these exercises comes from identifying how one can improve and then applying that knowledge consistently to one's habits.  These exercises have been so beneficial to my understanding of how to control the graphite medium that I wish I had focused on them before I even started my first cast drawing.  I am still looking for ways to significantly improve my graphite handling and if anyone would like to share their graphite handling advice with me please let me know.


Footnotes
¹ Jeremy Deck, personal communication, 2012-2014.

Sunday, February 9, 2014

Sculpting While Blocking-In

The block-in process is broken into a two-dimensional phase of copying shapes as they flatly appear on the picture plane and a three-dimensional phase of  evaluating how much each line segment is advancing or receding in space.  My instructor at The Cambridge Street Studios has recently been encouraging me to move on to the three-dimensional phase sooner in my process.  He explained through drawing demonstrations and discussions about the block-in process that the development of a block-in can be advanced closer to the final appearence without hindering the accuracy of the block-in after the placement of the large shapes are generally in place.¹  I have been experimenting with different ways to advance my block-ins after I place my large shapes and have found that combining the two-dimensional and three-dimensional phase at an earlier stage in the block-in process has allowed me to increase the pace that I proceed through a block-in.  An example and explanation of this process is below.

I quickly and lightly placed the shapes of the face while I constantly checked how the shapes were relating to each other through use of point to point measurement and comparative measurement.  It was useful to focus on a single shape that I could see most clearly, in this case the shadow under the nose, and built the shape relationships out from there.

 I strengthed the clarity and placement of the shapes in my drawing in the next pass. Then I lightened the lines of the nose that I would be drawing over during the next stage of three-dimensional thinking.

Combining Two-Dimensional Thinking With Three-Dimensional Thinking

If one were to represent the edge of a shadow shape on a sphere as being composed of many distinct line segments, as shown above, one could see how the line segments diminish in perspective as the edge of the shadow shape recedes in three-dimensional space.  The shapes that appear flatly on the picture plane, such as the shadow shape seen on the sphere, also exist in three-dimensional space and the position of the shape in space is make known by how much the line segments on the shape's edges advance or recede in perspective.  In the next three-dimensional phase I proceeded by sculpting how much each shape was advancing or receding in space by using line segments that advanced or receded in the perspective of my drawing.

I then just began to think as three-dimensionally as I could about the shapes on the face during the next stage.  Meaning that I was imagining my lines as advancing or receding in space while I was drawing a shape, with the intent of sculpturally representing the shapes of the forms that I saw.  For the form of the nose, I started at the ball of the nose and drew what is seen in the image above in one pass with some use of my eraser to try to clarify the shapes I was drawing.  I found that the more specific I could be about the many details along the edges of the shapes while I was drawing them gave me more to relate my next decisions to as I sculpted around the shape of the nose with line.
    
The main difference between this process and how I was drawing before is that I was not just focusing on how much a single line was advancing or receding in space, instead I was sculpting the entire mass of a shape by manipulating how much my line segments advanced or receded in the perspective of my drawing.  By doing this I was able to consider the two-dimensional appearance of the shapes while thinking three-dimensionally at the same time.

For the most part, this stage of the drawing proceeded by sculpting around a shape with line with little use of my eraser.  But, when I encountered issues with the placement of a shape during this process, as I did with the cheek, I had to lighten it with my eraser and return to more of  a two-dimensional way of placing the shape on my drawing.  Once I better placed a shape two-dimensionally on my drawing I could return to a mindset of sculpting the shape three-dimensionally with line.  Much point to point measurement was used to try to maintain the relationships of each shape to the other shapes in the portrait.  The images below show how I progressed through the drawing with the same process.   


This process made it apparent that by spending more effort to try to quickly and properly place the shapes in a drawing the block-in can much more quickly be approached three-dimensionally.¹  And if one retains clarity of the character of the shapes while they are sculpting the shapes three-dimensionally with line, one can begin to think three-dimensionally while developing the two dimensional shape at the same time.  The exclusion of the many intermediary stages between refining shapes two-dimensionally before thinking three-dimensionally about the shapes made this process much faster than how I had been drawing before.


Footnotes
¹ Jeremy Deck, personal communication, 2014.

Saturday, December 21, 2013

The Wire Mesh


A hand drawn wire mesh overlaying a photo of my drawing
Recently I have been learning about the importance of the idea of the wire mesh at The Cambridge Street Studios.  Footnotes are included in this post to indicate which sentences in this post are summarizations of ideas that the instructors at The Cambridge Street Studios have explained to me.

The idea of the wire mesh develops the basis of the mindset for modeling form.  Although the wire mesh is most commonly known for its use in 3-D modeling software, the idea of the wire mesh is just as applicable to modeling form in any medium.  While the modeling process is focused on sculpting the form in one's drawing to mimic the three dimensional structure of the forms one is copying, the application of the idea of the wire mesh to that sculptural thought process can help one to specify the structure of the forms one is copying.  The wire mesh allows for much of the specificity about the structure of a form to become apparent.

Wire mesh sketches of the model's mouth and chin from three angles from memory
By investigating the structure of a form from many angles one can better decipher how to sculpt the form in one's drawing.¹  I often make wire mesh sketches of the forms that I have been working on during and away from time with the model.  These sketches help to clarify the structure of the forms that I model.  The additional clarity gained from these sketches helps me to better define that structure in my drawing.

Adding Light Logic To The Idea Of The Wire Mesh


The planes on a form have a specific relationship to the light source based on where they are pointing in relation to the center of the light source.  The diagram above shows how the more a plane faces the light the lighter it becomes in value.  Taking this logic to my wire mesh studies has helped me to investigate the orientation of each plane to the light source.


Jeremy Deck recommends that I often make a wire mesh drawing of the planes on a form that I am about to model before modeling a new form.¹  Although the study above was made from one viewpoint, Jeremy Deck also recommends making planar studies of a form while standing in front of the horizontal center of each form to more clearly see the structure of a form.¹  I make tiny directional arrows projecting from these planes to clarify where the planes are facing.¹  When I place these studies next to my drawing before I am about to model a form I can better understand the structure of the form and the form's orientation to the light source.¹  This type of investigation helps in making the modeling process go faster because it reveals information about what I have to  represent before I even attempt to draw it.

Hand drawn wire mesh path overlaying a photo of my drawing

Additionally, it is helpful to base the directional path that I evaluate a form with on a directional path from the idea of the wire mesh.¹  Although I have found it crucial to evaluate a form in every possible path.  Thinking about the wire mesh really helps me to evaluate the form in my drawing to see if it correlates to the structure of a wire mesh on the model.¹  Essentially, the idea of the wire mesh becomes a tool for comparing the structure of the forms in one's drawing to the structure of the forms on the model.  This comparison is important because, the gradations in one's drawing reveal the specific structure of form that the wire mesh describes.

The idea of the wire mesh was very helpful to me while working on the drawing shown below.


Footnotes
¹ Jeremy Deck, personal communication, 2013.