Showing posts with label grand central atelier. Show all posts

Friday, July 6, 2018

Process for Amongst Ages Past


I used preparatory drawings of clothing, architecture and accessories, referenced master paintings and worked directly from life with a model to create this painting "Amongst Ages Past".  This piece is a part of The Great Library series and book I am developing.  A sample of the book can be seen on my website arthurhaywood.com

Every day scholars would pass from towering temples to breathtaking pyramids.  Centuries of achievement for Kings and Queens in that land inspired wonder.

Process

The process started with a linear drawing of the portrait to establish the shape, proportion and structure of the face.  This drawing was transferred to canvas using an oil transfer method. Doug Flynt describes this transfer method on his blog here.


I began this portrait in the studios of Grand Central Atelier.  Over the course of three weeks I worked from the live model to paint the portrait.  Each day I progressively painted one form at a time.  I had a general idea for the tone of the background so I painted the border a color I thought would establish the contrast I intended for the piece.  It was more manageable to adjust the softness of contour edges while both the portrait and the edge of the background were wet.  Although I changed the value of this border in places while working on the background later, the initial border color set up a base that was easier to develop upon.

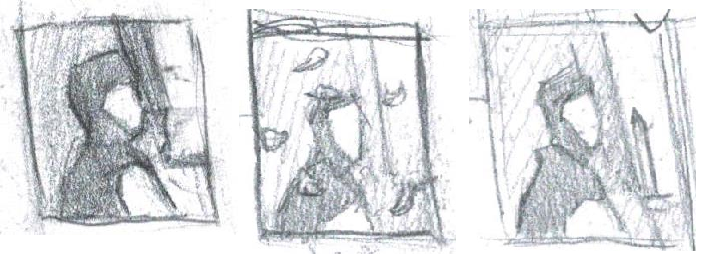
Compositions and Color Study
I tried out some in quick composition sketches.  I settled on the simpler design on the left.

After making the composition sketches I had a sense for where I wanted to place the architecture, clothing and accessories.  Then I made a small study for the piece.  I took a picture of my painting as it had progressed so far and printed it out much smaller.  I explored options for color relationships in the background on this study before I added the scene to the final piece.

Preparatory Drawings
I completed a number of drawings from life to utilize as references while painting the clothing, architecture and bag strap on her shoulder.

I used graphite and white charcoal to make this drawing of the shirt and satchel strap on myself in a mirror.

I visited the Egyptian Temple of Dendur at the  Metropolitan Museum of Art to make this study.  I gained more clarity about details such as chips and the structure of the building elements by drawing the temple from life.  Also, this drawing study gave me a sense of how subdued the contrast appears on the hieroglyphs in life.

References
I referenced master paintings to inform ways to describe the texture and form of objects.  A few of the paintings I referenced are shown below.

I referenced Bouguereau's Girl with a Pomegrante in painting the clothing.

I studied a painting by Hubert Robert to see how to incorporate the texture and color of ancient bricks.
 
The relief sculpture in Frederic Leighton's Self Portrait was helpful in getting a sense of  subtle suggestions of form while painting the hieroglyphs.


The background in Alma Tadema's The Colesium was referenced in painting the sky.

This image of Egyptian architecture at the Metropolitan Museum of Art guided me in choosing the color for the wall.  Many details were not as clear in this image as when I was making my drawing study from life.

Drawing on Canvas

The design for the piece in the color study guided me in placing the architecture and clothing on the canvas. After painting a layer for the background of the wall I drew the hieroglyphs.  I used vine charcoal to draw with because it is easy to erase.  After the proportions were established with line I was ready to move onto painting the hieroglyphs.

Blocking - In the Hieroglyphs


I painted the larger planes of shadow and upturned areas on the hieroglyphs somewhat loosely to suggest a texture for the wall.   I kept this layer on average a bit darker than the final value I intended for the wall.  I did this because I would be adding another layer on top with broken brush strokes that would be brighter in value to suggest texture.  The contrast of the darker under layer poking through the broken brush strokes in the next layer would create an appearance of a rougher surface.  I used this technique in painting textures of all the objects in the background, including the wall, sky, clothing and satchel strap.  In the sky the lighter layer was used to suggest a softer atmosphere.

Revisions
After a layer for the entire painting was in place I set the piece aside for a while.  Returning to the canvas I applied a layer of retouch varnish over the painting to bring back areas that had lost their gloss during the drying process.  Paint often dulls in value after oils that are on top of the surface while the paint is wet are later absorbed into the canvas while drying. This layer of retouch varnish or oil restores the value and color to how it was initially painted and would return to in a final varnish.  I primarily used oil during the painting process to restore the color of areas that I would be working on top of or next to.  The mixture I used consisted of a ratio of 2 parts Odorless Mineral Spirits and 1 part Walnut Oil, which produces quite a clear medium. 

With the actual color of the piece restored I then evaluated areas that stood out for me to adjust and made notes on reasons for making changes.  I proceeded to address these concerns one by one while revising the painting.  I would use Oleogel as a medium to slightly thin out paint while making revisions

Below are a few close up images of the painting with the added layer of texture and revisions.


More posts on the process behind my paintings will be shared soon.

Sunday, November 13, 2016

Winter Small Works Show

Eleventh Street Arts presents the "Winter Small Works Show" featuring classical artwork by many artists from the Water Street and Grand Central Atelier.  I am honored to have a piece in this wonderful exhibition.

A summary of this piece's narrative:
The potential of following a unique vision is suggested by the subject's determined expression, collection of books and extending background.

The opening reception is November 17th, 2016   6 -9 pm.  

This exhibition is on view through January 20th, 2017 by appointment.  Please visit, www.eleventhstreetarts.com

Saturday, May 28, 2016

First Year at Grand Central Atelier

As far as I got on my cast painting of Antiochus III by the end of the first year at Grand Central Atelier.  I learned a lot this year.

My experience at Grand Central Atelier has been better than I could have imagined before I moved to New York.  GCA, including its core program and workshops/part-time classes I have taken there, is by far the best school for classical art education that I have ever studied at.  Not only do the instructors continually provide valuable insights into how I can develop my technique and problem solving skills but furthermore I am surrounded by a positive environment of students who are constantly improving and are willing to share advice.  Also there are so many amazing museums and exhibitions showcasing the genre of classical painting that I have desire to align my work with and viewing those pieces in person has provided invaluable learning experiences that will inform my art for the rest of my career.  I have found the art community at GCA and in New York to consistently re-iterate the fact that progress is limitless.

 Some of the portrait drawings I worked on this year at school are shown below.

 Santiago from the May afternoon pose

I have been trying to improve on gaining a stronger sense of the larger overall form of the head while working to incorporate smaller sub-forms, such as the eyes, in their proper relation to the portrait.  My teachers have been very helpful in making me aware of ways to appreciate and focus on this aspect of rendering.  Paying more attention to the larger form of the portrait at first also has made it more effective and easier to incorporate the sub-forms. 

From the April afternoon pose (with added background and drapery)
While it is engaging to render, I have found that significant improvement lies in much comparison of my drawing in its relation to the subject, both in conceptual form and visual evaluation terms.  I have a tendency to constantly want to have my pencil to the paper or brush to the canvas.  Scott Waddell's advice this year was very helpful in organizing my working method to create better results. Getting into the habit of taking more time to evaluate my decisions has assisted in organizing the sub-forms to the larger overall forms in my portraits.  I noticed that the more I question whether I am getting closer to my goal the better I can see changes that need to be made.

Santiago from the March afternoon pose

 Thanks so much to the help from all of my teachers and peer students.  This year I am fortunate to have benefited from the teaching and advice from many of the instructors at Grand Central Atelier including, Scott Waddell, Patrick Byrnes, Devin Cecil-Wishing, Justin Wood, Brendan Johnston, Katie Whipple, Ted Minoff, Tony Curanaj, Josh LaRock, Jacob Collins, Colleen Barry, Will St. John, Zoe Dufour, Charlie Mostow, Sally Fama Cochrane and Katie Engberg.

I am very much looking forward to what awaits in my second year at Grand Central Atelier.

Thanks again to all who supported my art material fundraiser for school (The Arthur Haywood Education Initiative).  I am very fortunate to be learning so much with the supplies.

Saturday, May 14, 2016

Believe


I have most recently been working on a cast painting of "L'inconnoue de la Siene"(the unknown woman of Siene) at Grand Central Atelier.   The alleged story behind this cast is that the mask of this young woman was casted from a drowned individual in the Nineteenth century because her face and expression was captivating and beautiful.

Radio Lab has a very intriguing podcast on the history of this cast here.  The mask became popular throughout Europe in the Nineteenth century and was later used as the basis for the model of the CPR doll.  The podcast is interesting as it refers to the relevance of this young woman who drowned to later becoming the model for mouth to mouth resuscitation.  Generations of people use the CPR doll to practice relieving individuals from drowning and in a sense bring them back to life.

In a similar sense, the approach to painting and drawing taught at Grand Central Atelier focuses on creating believable form to recreate the appearance of individuals.  I titled this painting "Believe" as it was my attempt to make this young girl believable again.  Although I did not nearly meet my goal with this painting I did learn a lot during the process.

I tried to believe in the dimension and reality of each form as I created it and worked my way throughout the portrait form by form.

In my opinion, the more believable the subject of my painting can be the more deeply the translation of specific emotions can be conveyed to communicate specific messages in my art.  Although this painting is just a study the lessons learned from this exercise will allow me to more effectively communicate with my art when I create narrative paintings.

This painting along with a few more of my pieces will be on display as part of  Grand Central Atelier's End of Year Student Show, May 20th 6-9pm and May 21st and 22nd 12 -6 pm.  Located at 46-06 11th Street, Long Island City, NY 11101.  

Lessons Learned

I did learn a lot of new beneficial practices while working on this painting from my instructors and peer students at Grand Central Atelier.  I learned of the benefits of using little bit of a leveling medium, such as Epoxide oil gel, to reduce the amount of textured paint strokes that can accumulate while continuing to adjust paint during the wet into wet painting process. I also learned that when too much paint accumulates on my painting it can be helpful to take a brush with less paint on it and tap into the area to remove the excess paint before trying to more carefully reapply a more specific gradation.  It was helpul to use a thicker amount of paint on this piece to be able to manipulate the paint longer without removing paint down to the surface of the linen.  The more I practiced I tried to get a feel for applying enough paint for it to glide over the weave of the linen.  I noticed that the texture of relatively thick paint initially applied is naturally smooth and when paint is applied so thinly that it is seen between the weave of the linen as opposed to on top of it, the irregularity of the surface creates a texture that is not smooth.

Also, a value painting workshop that us first year students had with Tony Curanaj allowed me to learn more about paint handling.  I learned that while much of making gradations with paint initially involves carefully placing progressions of tone with distinct values of paint that describe a curve of form, the gradation can be refined by carefully dragging those specific tones into each other.  Even though this process can help , I still have to be careful to not completely remove needed paint while blending.  As far as reworking and seams go, I still have yet to figure that out, as my painting is filled with seams.  But while reworking I did get a glimpse into how much refinements can be guided by a feel for what to expect the paint to look like after it has dried and been varnished.  Hopefully if I can be more careful during my initial pass and during reworking on my next painting I will improve.

Saturday, February 27, 2016

Cast Painting at Grand Central Atelier

 I have been learning about many ways to approach modeling form in paint at Grand Central Atelier.  Since I started painting at GCA my development has been significantly aided by help from my cast painting teachers, Patrick Byrnes, Devin Cecil-Wishing and Justin Wood in addition to beneficial advice from my peer students and some helpful critiques from Scott Waddell, Will St. John and Brendan Johnston.  My teachers and peer students have so much insight they offer and I feel that I am just tapping into realization of many aspects of form painting.  I still have very far to improve with my painting abilities but this post describes some things I have learned in my development so far.

I begin the painting process by making a block-in drawing that describes linear boundaries of information on the cast.  Making a block-in for a painting is no different than creating a block-in for a drawing except that with the added difficulty of changing areas of wet and dry paint the consequences of adjusting mistakes in the block-in while painting can be more severe. So I pay close attention to specificity in the shapes while blocking-in.


The relationship between the block-in and modeling is symbiotic.  The block-in holds the modeling like the shell of an egg.  As a result, the modeling can never become more dimensional than the shape it is confined to.

Knowing that the shapes of the block-in may become slightly adjusted during the painting process I usually leave the lines in my block-ins with a slight width to make the transferred drawing on the linen easier to interpret.  With a slight width in line I also can have the opportunity to view the form boundaries as existing somewhere within that thickness of line, which gives me flexibility to determine the final shape of each form through form analysis.  This flexibility in the lines of the block-in is helpful for me because, it can be difficult to model form while being confined to the rigid boundaries of a block-in that was not completed with as in-depth form analysis that takes place during the modeling process.

Value Study


Before approaching the actual painting I create a small value study to use as an aid in managing the large relationships on the form while I later model the form in small sections.  The value study acts as a map for the value range in the cast.  By referencing the relationships in the value study I can gain a better sense of which area of my value range I should be in while working on individual parts of the cast

Underpainting


The block-in is transferred to the painting surface using an oil transfer.  This process is described on Doug Flynt's blog here.  After the block-in is transferred to the surface of the linen that I paint on, Art Fix, I complete an under-painting using paint thinned with odorless mineral spirits.  The under-painting provides coverage of the light value of the surface to create a layer that is more similar to the final values of the form painting.  If parts of the final form painting are thinner, the under-painting that is similar in value will show through instead of the light color of the ground.

I personally have preferred to keep the under-painting in a looser state to be able to clearly isolate the gradations of my modeling to make it easier for me to evaluate.  I have tried working on under-paintings that were closer in value and handling to the final form pass and struggled with evaluating the gradations as I painted because the final pass was so similar to the values of the under-painting.  Although, I imagine if I had a stronger ability to retain the conception of the overall form this difficulty of  isolating each parts gradation would not be such a struggle.  For me, the gradation is one the most difficult aspects of form to describe in suggesting the three dimensionality form.  Since I am still developing in comprehending form, I find it easier to retain the conception of one slice of a form at a time that I can easily evaluate. I currently have found it easier to manage modeling form by building the relationship of forms through focusing on developing them in smaller strip like sections at first.

Modeling Form

Form modeling in paint is essentially just drawing with paint.  The logic of light on form does not change and modeling proceeds in the same way as with graphite except with the added difficulty of controlling gradations in paint.  I proceed by creating a strip of form that suggests the curve of form as it gets lighter on its path to facing more towards the light.  It is beneficial to begin in an area that contains most of the value range on the cast, such as the darkness of a shadow to the lightness of a section of form that is most facing the light.  Although in the instance of the above image I made the mistake of  not beginning in the area where the form turned most towards the light, which made it difficult to manage relationships in the cast during the process of painting it.

For me, it easier to distinguish the modeling from the looser under-painting as if the form is a shell.  I often even imagine running my finger underneath the strip of form that I create in my paintings to see if it feels like the form should bulge out in certain areas to make the fullness of form closer to the roundness of form on the actual cast.

I create gradations in paint by dabbing a progression of values next to each other.  In areas of form that contain a broader planes I lean towards applying larger strokes of paint instead of smaller dabs.  My goal is to place small sections of value that are progressively lighter than the preceding stroke to suggest a subtle turning of form toward the light.  For each strip I often begin at the shadow and slowly crawl up the hill of form one slight change in value at a time to create a gradation that suggests the curvature of form on the cast.  I try to use thick enough paint that shows a solid value of paint with each stroke.  Due to the wet into wet nature of oil painting I can also utilize how similar values of paint blend into each other to create intermediary values but in doing so I have to remain focused on creating a specific gradation of form.  The intermediary values that blending can create are not always the specific values that describe the form.  If I do not pay attention to the effect that wet into wet blending is creating I can easily lose a specific gradation of form.

I find it important to reflect on the form consequences of each paint stroke.  I have often blended mindlessly and pretty much just blended past the values that I wanted without paying attention.   I try to remain conscious of the effect of each added value to the turning of form.  With painting it is all a matter of making precise and deliberate decisions.  Once paint is on the surface adding more paint continues to build up the surface and can make it more difficult to easily adjust the values of paint.  I have found it helpful to preface each brush stroke with the question of whether to turn parts of the form towards or away from the light.  Choosing whether to make the stroke lighter or darker. Then I just try to push the form to where I intend it to turn to. 

As the painting progresses the shell of form expands one form at a time, just as in the drawing process.  In the image above the top left form on the brow is isolated because it is not yet painted.  Because gradations in paint are much easier to adjust while wet than when dry I have been taught about the benefit of completing an entire form during each painting session to avoid significant seams in the middle of forms.  I also use a soft brush to drag the paint along the border of the boundary of each form that I complete during a session to provide a valley for the paint during the next session to attach to without the harsh border of thick paint.

With the top left form of the brow painted in I am still progressing with the painting of the eye.  An image of the completed painting is below.


Brushes

I have learned from Devin Cecil-Wishing that brushes can be shaped differently to make it easier to adjust gradations in specific ways. I have mostly been using cheap synthetic oil painting brushes from Blick Art Supplies that can get a sharp point and have substantial spring to assist in controlling each paint stroke or dab of paint.

 Pointy brushes can be helpful for adjusting tiny areas of a gradation that require more precise control.

These same brushes can be patted down to create a flatter surface area that can be helpful in adjusting larger areas of a gradation.  I have found that the size of brush to use is in relation to the size of the form and the area of a gradation that is being modeled.  Devin Cecil-Wishing has also taught me the benefits of using multiple brushes for lighter and darker areas to limit the contamination of values that occurs during wet into wet painting.

A large very soft brush can be helpful as a final touch to a section of modeling to blend away surface ridges of paint that have accumulated in the modeling process.  I usually only use a large brush at the very end of a painting session for that purpose.  Even while trying to remove those surface ridges at the end I remain conscious of how I may be adjusting the form and try to keep the form in mind as I blend.

During the modeling process I initially try to place each value of paint in the gradation as specifically as I can and then adjust the form by adding more paint to alter the value.  When I find that adding more paint leads to significant building up in the thickness of paint I often use a brush with little or no paint on it to try to bend the values into where I want them to be on the form.  Since I still don't have very much control of paint, I have found that changes in adjusting wet paint often requires some back and forth work of adding paint and blending to bend the form to a desired curve.


 Paint Use

 My teachers have emphasized the importance of using a substantial amount of paint to make it easier to manipulate.  I have found that with more paint on the surface I can adjust my gradations while limiting the amount of paint that I am taking off of the surface with my brush while making adjustments.  Painting too thinly was a serious issue that I especially struggled with on my first cast painting of the ear. I was painting so thinly that the color of the white ground significantly showed through my painted layer and created a surface that was very uneven.  Also, since I did not do an under-painting for my first painting of the ear the value of the white ground was drastically different from the values in the form pass which made the unevenness even worse than if I painted thinly on an under-painting.


 I am still struggling with controlling paint but these materials and techniques that I have been learning are helping out.  I am striving to create form in paint that suggests very specific curves of form and am still struggling with controlling the evenness of my gradations.  I often get distracted by the desire of creating a smooth surface and lose a tactile sensibility to the form modeling.  I have found it more helpful to remain focused on gaining a tactile sensation of creating from that I can believe is three dimensional and making the best decisions I can with my painting materials to sculpt the form to that effect.   When I am in that state of mind I find that as a result my form modeling becomes smoother by being more specific to the curvature of the form.

Painting Process

Value Study


Underpainting


 Reworking

 After initially completing the painting form by form I selected a few areas to improve upon during the reworking stage.  One area that I wanted to adjust was the overall roundness of the chin.  I wanted to turn the bottom planes of the chin more away from the light so that it would be more opposed to the direction of the more light facing planes on the upper chin.  I have found it important to determine exactly how I want to adjust sections of form before beginning the reworking stage to make it easier to proceed with focus.

I have been taught to begin the reworking stage by applying a small amount of retouch varnish over the entire painting to bring back the gloss from areas of the painting that have sunken in.  When reworking, I add just a bit of Oleogel to my paint to slightly thin my paint where necessary. But in areas that require significant lightening or changes I end up using paint without medium.  In areas that require significant changes in reworking, such as the chin, I ended up repainting the entire form to provide a more unified surface quality.  I proceeded by selecting a section of form to adjust and tried my best to make decisions based on how I want the form to change as opposed to making rapid decisions based on pure optical judgements of value.  By validating my decisions with form analysis I can proceed with the same amount of care in trying to create specific gradations of form as I had in the initial form painting.  Being that specificity of form is an important goal for me, I try not to lose that focus while reworking.

I learned a lot while making the cast painting shown above.  I have so much more to learn as I progress with my current cast paintings at Grand Central Atelier.

Tuesday, January 26, 2016

Phases of Vision

 The process of representing what is seen involves recognizing the phases of visual interpretation. Although at first glance one can clearly recognize an image of a face as a portrait, the task of describing the visual information that makes up a portrait is much more difficult to do in an instant.  Even though we are presented with one unified visual image it can be described as consisting of individual parts, a subject that Brendan Johnston has described to us first year students at Grand Central Atelier.  In the simplest sense, what one sees consists of shapes, values and colors.  In the block-in those shapes undergo rounds of investigations to arrive at an understanding of the qualities of shapes.

As a first year student at Grand Central Atelier I have been practicing figure block-ins with the aid of my teachers, Brendan Johnston, Patrick Byrnes and Josh LaRock.  They have shared advice with me on an efficient approach to the block-in process that has been passed down through the teaching of Jacob Collins and other instructors.

The visual shapes one sees are inevitably tied to the structures that they are made of, such as the shape of an eye in shadow.  But this symbolic association of an eye in general can distract one's interpretations from observing the particular qualities of each shape.  Learning to see shapes in their purest and actual sense can be at first approached by breaking its line segments into the most clearly observed pattern.  Although the simplicity of the drawing in this stage may seem overly basic, the lines at this stage represent what I know about the shapes from initial investigation, a subject that Brendan Johnston has discussed with us first year students often.

 By the next phase of shape investigation I am  continuing to search for the specific qualities of shapes.  Although it is often tempting for me to declare that shape investigations are over early in the drawing process and launch into refining those shapes, this has often led me to represent symbolic generalizations of the structures that the shapes describe and has led to drawings that look less like the visual images that I see. In order to remain aware of the particular qualities of shapes requires an active openness to searching out the subtleties of each shape in the block in.

I had a discussion with Patrick Byrnes about what can help to retain an open awareness to the specific qualities of shapes and learned about the importance of searching for the exact shapes through constant questioning of all the shapes together.  Through continuing to question the particular qualities of shapes on the visual image the block-in becomes more clearly revealed.  The more the shapes are questioned through investigations the more truth is revealed in the answers found.

 After thorough investigation into the shapes, the block-in progresses by evaluating how the shapes correspond to the three dimensional structures they represent.  I  heard Josh LaRock comment on the importance of realizing when to switch to evaluation of  structures to develop a block-in past the shape phase.  Through interpreting each tilt of a shape as a segment of a plane as it corresponds to perspective and light effects, such as terminator and cast shadow edges, I could arrive at a more clear representation of the visual information that at first glance I actually was so unfamiliar with.

Below is an image of another portrait block-in drawn at Grand Central Atelier made using the same process.  Images of this process on figure drawings can be seen here.

Saturday, December 12, 2015

Taking Time


Looking at the point of my pencil, it never ceases to captivate me, the idea of how refined form can possibly become if represented to the precision of that fine tip.  Such wonder lead me through creating this eye cast drawing to investigate the subtleties of form at Grand Central Atelier.  My drawing proceeded by taking time to carefully construct gradations that represented specific curvatures of form one section of form at a time.


While  making deliberately constructed sections of form allowed me to closely study each forms specific surface, I also had to consider those smaller aspects in relation to the larger forms on the cast.  With this drawing I noticed I was able to develop more of an ability to retain a sense of the structure of larger forms while making smaller changes to them.  Since I put careful thought into the structure of each form as I constructed them, as I refined the form I could gain a better sense of where I wanted the form to develop and which areas that needed to conform to the specific curve of form I intended to make.  However I often lost sense of the larger forms while working on smaller aspects, such as sub-forms like the folds in the eye brow.  A critique from Scott Waddell showed me how to evaluate the form in the simplest possible way in order to regain a sense of the hierarchy of larger forms to the smaller forms that sit on top of them.


While progressing with this drawing I developed more of an appreciation for the idea that the smaller forms only gain significance when in their proper relation to the larger forms that they depend upon.  Working in a slow form by form method can sometime cause loss of awareness to the integrated nature of form.  But I found that the more time I spend practicing to retain a sense of where I am modeling in relation to the hierarchy of the overall form of the cast I can develop a better sense and ability to properly place smaller forms and larger forms.  I will continue taking time to carefully study form with my upcoming cast projects.

Thanks so much to the great help from all of my teachers for cast drawing, Devin Cecil-Wishing, Patrick Byrnes, Scott Waddell and the teachers who sometimes came by to help and encourage me with my drawing, Josh LaRock, Jacob Collins and Colleen Barry.  I couldn't ask for better instructors.

Thanks again to all who supported my art material fundraiser for school (The Arthur Haywood Education Initiative).  I am very fortunate to be learning so much with the supplies.