Friday, April 12, 2019

Pencil Kings Interview

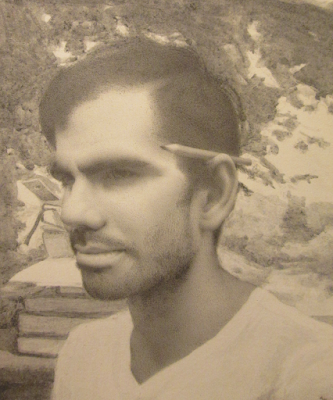
I was recently interviewed on the Pencil Kings Podcast by Mitch Bowler.  We discussed my book The Great Library and how I developed my approach from learning in different schools including Grand Central Atelier, Cambridge Street Studios and the Maryland Institute College of Art.


The podcast can also be listened to on Itunes , Stitcher and Pencilkings.com
Thank you for sharing my story Mitch. And thank you to all of my teachers and classmates that I have learned from and been inspired by as well as family and friends that support me.

My book, The Great Library can be viewed on my website at arthurhaywood.com/p/the-great-library.html

I also should mention that I have tutorials on the process that I have used for my work on my blog, arthaywood.blogspot.com to share the steps to my approach with learners online. I have described ideas that I have been learning about during my classical painting and drawing education up to the present.

For me, developing my work has been a matter of practice and guidance. I have been fortunate to get a lot of practice from life. But there are online ways of online learning that share these steps of classical drawing and painting. Such as Scott Waddell's video tutorials on scottwaddellfineart.com . Some of his shorter tutorials are on youtube at youtube.com/user/waddellwebisodes . He also has an Online Teaching Program . Scott Waddell was a really influential teacher for me that I studied with at Grand Central Atelier .  Other influential teachers that I studied with at Grand Central Atelier who have video tutorials which introduce this process are Jacob Collins, Joshua Larock , Gregory Mortenson Devin Cecil-Wishing , Doug Flynt , Tony Curanaj and Edward Minoff

Pencilkings.com and the Evolve artist program that Mitch Bowler is working with also has very informative art tutorials that are great.

Other Links mentioned in the podcast:

Artistacon: www.artistacon.net
Grand Central Atelier: www.grandcentralatelier.org
Maryland Institute College of Art: www.mica.edu
Cambridge Street Studios: www.cambridgeststudios.com

Tuesday, April 9, 2019

Process from Such Great Heights


Such Great Heights, Graphite, 14 x 21 inches
(Image Courtesy of Arch Enemy Arts Gallery)

This piece began with a linear drawing from life. I established the boundaries of individual features, the overall figure and areas in shadow. The line drawing of the figure took about 12 hours. I started with larger relationships of shapes and broke those shapes into smaller shapes to become more specific. I refined the line drawing by evaluating how the linear boundaries described the dimension of individual forms.

First I filled in the shadows to a solid value. I drew the portrait by focusing on one form at a time. I concentrated on using gradations to represent how subtly each form turned darker as it curved away from the light. For example, within each 4 hour session with the model I would complete a nose or the forehead. After the line drawing, the entire portrait took about 40 hours to render.


This is how far I got on the portrait by the end of the month's pose while I was studying at Grand Central Atelier.

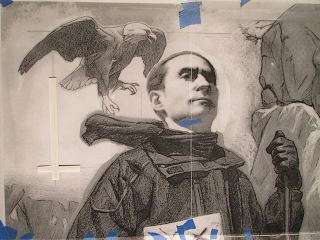
I wanted to turn this drawing into a narrative piece about a hiker's achievement and exploration. This small composition study was one of many that allowed me to quickly explore how I could alter the pose and background to tell a story.

  I printed out my portrait drawing at a small scale and drew different versions.

I used a mirror to draw the clothing on myself from life. Since I would move from time to time I started with larger proportions of the figure and major folds. Then I drew one area at a time when I could hold still. For example I started with the glove.

The completed clothing study.
I had to do a separate study of the knee because I wanted a different angle.

I went to the Academy of Natural Sciences to draw the eagle and rocks.

I went to Pennypack Park to draw the waterfall.

I compiled each of these studies digitally to scale them together.  I also experimented with contrast and value relationships. Then I printed this design so I could transfer the boundaries of the clothing and  background onto my drawing.

I had a vertical and horizontal level line established on my drawing. I used the orientation of this line to align my transfer print on the drawing.

I rubbed a 6B graphite pencil on the back of the print and used a ball point pen on top of the print  to go over the outlines of the clothing and background.

The areas where I pressed down left a line of graphite on the drawing. It was quite light in value at first (as seen in the picture right arm). I went over these lines with again with pencil to darken the lines.

I placed some glassine paper over the portrait while doing the transfer to prevent graphite from getting on it. Then I filled in the shadow areas with graphite.  After this I used powdered graphite to  fill in large areas of value. For example the rock in the picture above.

I used a synthetic brush to spread powdered graphite on my drawing. After the areas of value were massed in I used a pencil to refine the forms. I mostly used 2H, H, HB and 2B Steadler pencils.

The preliminary studies really helped to make the final drawing progress faster. I was able to figure out more of how the forms and values were organized at first. The actual drawing on the clothing and background on this piece, after it was transferred, took me about 3 days.


(Image Courtesy of Arch Enemy Arts Gallery)

This drawing is at Arch Enemy Arts for the 7 Year Anniversary show from April 5th - 27th, 2019.

The exhibition is free and open to the public.

Viewing: Wed - Sat   12 - 5  PM

Located at Arch Enemy Arts, 109 Arch Street, Philadelphia, PA 19106

To inquire about the drawing please contact the gallery at archenemyarts@gmail.com
www.archenemyarts.com

Monday, April 8, 2019

Portrait Drawing Process


This portrait began with a linear drawing.  I established the shape and dimension of the features and the overall head. I also considered the boundaries of the shadow shapes on each form. I lightly filled in the shadow areas.

I filled in the shadow areas to a solid value first. Then I began rendering the simple form of the nose. I started on the ball of the nose which is spherical. I moved onto the wing of the nose and then the bridge of the nose.

I thought of modeling on each form based on how much each area of the form turned towards or away from the direction of the light.  According to this concept the form becomes incrementally darker as areas turn more away from the light most facing area.

Every form is curved and spherical to an extent. Drawing different forms in the portrait, such as the nose, was just an extension of this idea to differently shaped forms.

I progressed the portrait by focusing on one form at a time.  This made it more manageable to organize the gradations that curve with form.  This process also made it easier to evaluate how my gradations represent the curvature of the form. Each form is isolated so I can focus more intensely on organizing the gradations that describe its volume.

I build each form by creating curves of gradation. I add one curve next to the previous until the form is laid in. An initial curve of gradation is like the one seen in the cast drawing below. 


It's like creating a sculpture with value, one curve of form at a time. I think of the white of the paper as being a piece of marble and my pencil as a chisel. The more I turn an area darker the more I am pushing it away from the light. When I turn an area too far away from the light I use my eraser to tip the area more back towards the light.

This is a slow process of working towards the final resolution on each form. I find that I have to do less reworking with this approach.  I try to be as specific as I can when initially rendering each form. After building each form with curves of gradation I spend time organizing the volume of the form. Each feature, such as the nose, forehead, cheek and mouth took me about 4 - 6 hours to draw.

The decisions I make on earlier forms inform additional forms. As I moved into the cheek I based the values on the relationship to the orientation to the forehead. Much of the cheek is more turned away from the light than the forehead.

The drawing progressed based on the volume of the portrait. An edge of the hair was added to give a context to the value range.  Then I drew the remaining forms of the ear, neck and hair.

 I added the background with powdered graphite that I diluted with water. The value range was set up in the portrait. I wanted the hair to be the darkest value. To make the background recede, the more narrow value range of the background was drawn in relationship to the darkness of the hair.

Independent Scholar, Graphite, 4 x 5 inches

Tuesday, April 2, 2019

Philadelphia Sketch Club Small Oils

Two paintings from my Library of Alexandria series are on display in the Philadelphia Sketch Club's Annual Small Oils Exhibition.

The pieces on the flyer,

"Ancient Wonder" (8 x 10 inches), focuses on how the wonders of the galaxy’s depth captivated many in the ancient world. The armillary sphere on this astronomer's shelf alludes to the study of stars in the galaxy.

"Limitless Galaxy" (9 x 11 inches), reflects on how all the knowledge accumulated in the past leaves inspiration for how much can still be discovered in a limitless galaxy.


These works are a part of a series about scholars from the library of Alexandria in Egypt and how they influence aspirations for learning. More pieces and the book being developed from the series can be viewed at arthurhaywood.com

The show will be on display from April 1st- April 30th, 2019.  The exhibition is free and open to the public.

 
Viewing: Wed, Fri, Sat & Sun   1 - 5  PM

The Reception is April 28th , 2 - 4 PM 

Located at the Philadelphia Sketch Club, 235 South Camac Street, Philadelphia, PA 19107
To inquire about the piece please contact the gallery at info@sketchclub.org
www.sketchclub.org