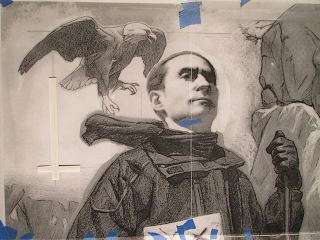
This piece began with a linear drawing from life. I established the boundaries of individual features, the overall figure and areas in shadow. The line drawing of the figure took about 12 hours. I started with larger relationships of shapes and broke those shapes into smaller shapes to become more specific. I refined the line drawing by evaluating how the linear boundaries described the dimension of individual forms.
First I filled in the shadows to a solid value. I drew the portrait by focusing on one form at a time. I concentrated on using gradations to represent how subtly each form turned darker as it curved away from the light. For example, within each 4 hour session with the model I would complete a nose or the forehead. After the line drawing, the entire portrait took about 40 hours to render.
This is how far I got on the portrait by the end of the month's pose while I was studying at Grand Central Atelier.
I wanted to turn this drawing into a narrative piece about a hiker's achievement and exploration. This small composition study was one of many that allowed me to quickly explore how I could alter the pose and background to tell a story.
I printed out my portrait drawing at a small scale and drew different versions.
I used a mirror to draw the clothing on myself from life. Since I would move from time to time I started with larger proportions of the figure and major folds. Then I drew one area at a time when I could hold still. For example I started with the glove.
The completed clothing study.
I had to do a separate study of the knee because I wanted a different angle.
I had to do a separate study of the knee because I wanted a different angle.
I went to the Academy of Natural Sciences to draw the eagle and rocks.
I went to Pennypack Park to draw the waterfall.
I had a vertical and horizontal level line established on my drawing. I used the orientation of this line to align my transfer print on the drawing.
I rubbed a 6B graphite pencil on the back of the print and used a ball point pen on top of the print to go over the outlines of the clothing and background.
The areas where I pressed down left a line of graphite on the drawing. It was quite light in value at first (as seen in the picture right arm). I went over these lines with again with pencil to darken the lines.
I placed some glassine paper over the portrait while doing the transfer to prevent graphite from getting on it. Then I filled in the shadow areas with graphite. After this I used powdered graphite to fill in large areas of value. For example the rock in the picture above.
I used a synthetic brush to spread powdered graphite on my drawing. After the areas of value were massed in I used a pencil to refine the forms. I mostly used 2H, H, HB and 2B Steadler pencils.
The preliminary studies really helped to make the final drawing progress faster. I was able to figure out more of how the forms and values were organized at first. The actual drawing on the clothing and background on this piece, after it was transferred, took me about 3 days.
This drawing is at Arch Enemy Arts for the 7 Year Anniversary show from April 5th - 27th, 2019.
Viewing: Wed - Sat 12 - 5 PM
Located at Arch Enemy Arts, 109 Arch Street, Philadelphia, PA 19106
To inquire about the drawing please contact the gallery at archenemyarts@gmail.com
www.archenemyarts.com
www.archenemyarts.com


No comments:
Post a Comment